You have to delete at least the files with extension ccf from Program Files qtContgen. You can delete the whole directory also.
Install the application from qtContgen-2.2.0-install.exe.
Save your databases with mysql administrator.
Start the program and enter as root.
Update the databases with button Update all databases from Cofig - Manage databases (the one with two towers and an up arrow on it).
You are ready to use the new version.
Te application it's compiles with qt 4.7.0 so the installer contains more dll-s (the size is about twice compared to beta3).
I deleted the compiled plugins from source so I will explain here how to compile them, how to compile the application under windows and linux
and how to create the windows installer.
Windows
Download and install the qt sdk for windows from qt.nokia.com.
To compile the mysql plugin you will need the mysql include and lib files. You can download them from here.
To compile the firebird plugin you will need the firebird include and lib files. You can download them from here.
Extract them to c:\. You are free to use another drive but then you have to make de changes in qtContgen.pro.
Download and extract the source. You cat put it anywhere, but it's recommended to make an empty directory for it.
Enter in x:\Qt\2010.05\qt\src\plugins (where x is the drive Qt SDK was installed on) and open qpluginbase.pri with a text editor.
After CONFIG += qt plugin - insert static (so the row will be as follows: CONFIG += qt plugin static) then save the file.
Start a Qt Command Prompt from de menu. (Programs - Qt SDK by Nokia v2010.05 (open source) - Qt Command Prompt)
Enter in x:\Qt\2010.05\qt\src\plugins\imageformats and run the following commands:
qmake
mingw32-make
After the succesfull compilation go to x:\Qt\2010.05\qt\src\plugins\sqldrivers\mysql and run:
qmake "INCLUDEPATH+=c:/mysql/include" "LIBS+=-Lc:/mysql/lib/opt -lmysql" mysql.pro
mingw32-make
Now go to x:\Qt\2010.05\qt\src\plugins\sqldrivers\ibase and run:
qmake "INCLUDEPATH+=c:/firebird/include" "LIBS+=-Lc:/firebird/lib -lfbclient" ibase.pro
mingw32-make
Copy now the libqsvg.a file from x:\Qt\2010.05\qt\plugins\imageformats to the pluginw directory from source.
Idem with libqsqlmysql.a from az x:\Qt\2010.05\qt\plugins\sqldrivers to pluginw
and the libqsqlibase.a from az x:\Qt\2010.05\qt\plugins\sqldrivers to pluginw.
Run again the Qt Command Prompt go to the root of the source and run:
qmake
mingw32-make release
lrelease qtContgen.pro
Copy the following files in wininstaller directory:
qtContgen.exe from release to wininstaller.
The contgen, gest and salar directories from source to wininstaller.
The files with extension qm from lang directory from source in the lang directory from wininstaller.
A forrás könyvtárából a ccf kiterjesztésű állományokat a wininstaller könyvtárba.
The files with ccf extension from source to wininstaller.
The qgif4.dll, qico4.dll, qjpeg4.dll, qmng4.dll, qtiff4.dll files from x:\Qt\2010.05\qt\plugins\imageformats to wininstaller plugins\imageformats.
The libgcc_s_dw2-1.dll, mingwm10.dll, phonon4.dll, QtCore4.dll,
QtGui4.dll, QtNetwork4.dll, QtSql4.dll, QtSvg4.dll, QtWebKit4.dll files from x:\Qt\2010.05\qt\bin könyvárból a to wininstaller.
libmysql.dll from c:\mysql\lib\opt to wininstaller.
Download and install the NSIS application.
Right click on Installer.nsi and choose the Compile NSIS Script opction.
If you had no error so far you have the installer in wininstaller directory - qtContgen-2.2.0-install.exe.
Linux
Download and install the qt sdk for your architecture from qt.nokia.com.
Create a symlink for the qmake in /usr/local/bin:
sudo ln -s /home/user/qtsdk-2010.05/qt/bin/qmake qmake47
We have to do this to avoid confusion with the distribution's qmake.
Install the following packages: libmysqlclient.dev, firebird-2.1.dev and qt4-dev-tools (for lrelease). The exact name may be different in your distribution.
Download and extract the source. You can put in anywhere but it is recommended to make an empty directory for it.
Enter in /home/user/qtsdk-2010.05/qt/src/plugins and open qpluginbase.pri with a text editor.
After CONFIG += qt plugin - insert static (so the row will become: CONFIG += qt plugin static) then save the file.
Enter in /home/user/qtsdk-2010.05/qt/src/plugins/imageformats and run:
qmake47
make
Go to /home/user/qtsdk-2010.05/qt/src/plugins/sqldrivers/mysql and run:
qmake47 "INCLUDEPATH+=/usr/include/mysql" "LIBS+=-lmysqlclient_r" mysql.pro
make
Now go to /home/user/qtsdk-2010.05/qt/src/plugins/sqldrivers/ibase and run:
qmake47 "LIBS+= -lfbclient" ibase.pro
make
Copy the libqsvg.a from /home/user/qtsdk-2010.05/qt/plugins/imageformats to directory plugin from the source.
And so on with libqsqlmysql.a and libqsqlibase.a from /home/felhasználó/qtsdk-2010.05/qt/plugins/sqldrivers to plugin.
Go now to the root directory of the source and run:
qmake47
make
lrelease qtContgen.pro
sudo make install
If you went so far without errors you can run the application from /usr/local/bin with qtContgen command.
The update of the databases written above remains valid.
First of all, you have to use the 5.1 version of the mysql server in order to execute the below written procedures. You have to save your databases with mysql administrator install the 5.1 server and then restore the saved data.
If you are going to make a fress install, and you have no mysql server acces:
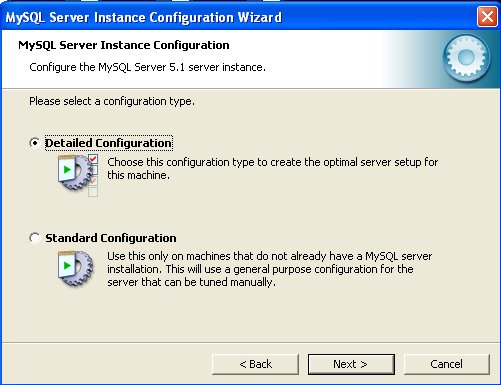
Install the mysql 5.1 server downloaded from www.mysql.com. Use the following configuration options:
Choose the detailed configuration.
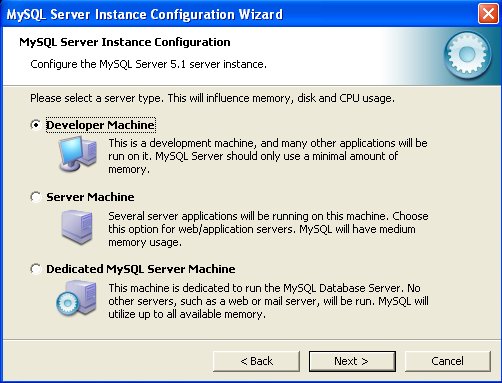
Choose the appropiate option.
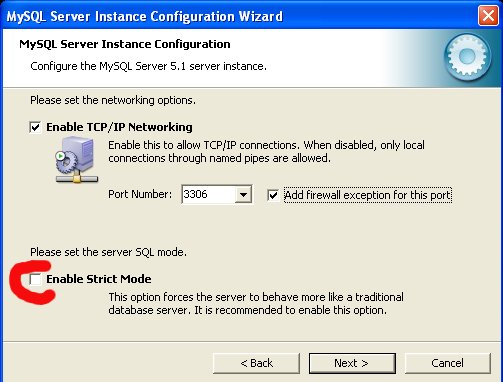
It's very important NOT to check the Enable Strict Mode option
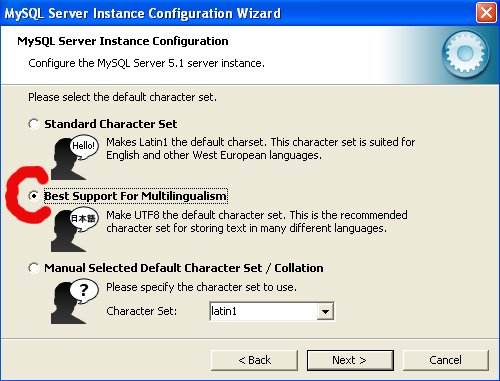
Choose the multilingualism option.
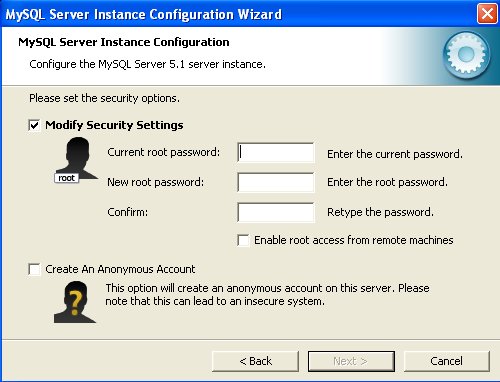
Set the root password.
Check the Enable root access from remote machines if you want to
connect to the database from remote machines.
I have to mention here, that it's a bad practice to
use the application as root. Create a simple user
and execute the daily chores with it. You have to
use the root account only for administration tasks.
(Just a mention. The ordinary user expects from an application to execute
all the tasks it requires for functionality. They don't like to use
external administrativ applications, especially the command line.
So I introduced some database administration options in the application)
You can install now the qtContgen-2.2.0-beta3-install.exe (on vista and windows 7 use Administrator mode for run the installer)
We are done. You can lunch the application from the main menu, and you can copy the luncher to the panel or the desktop.
When you first run the application, enter root as user, give the root password, on details- host enter the ip address
of the mysql server machine and press OK.
Appears a warning that database contgen isn't found on the server. Press Yes to create it.
Then you can create databases for companies with the green plus. You have to specify the database name and the company name.
You can create as many databases as you want.
You are done, have fun!
If you have working databases, login as root, and press the config - database administration menu option. In the left part of the dialog you have four buttons. The one with a plus creates new databases - similar to the green plus from login dialog -, the one with an up arrow updates the current database from the list. The one with two racks and an up arrod updates all databases - included the contgen one, and the fourth button updates the contgen database. You will be announced in an information box if the database has already the newest version,
Important. You have to quit and relogin in the application after the updates.In the right part of the database administration dialog you can give acces rights to the users - created with the user administration dialog - for the current database from the list.
The application's architecture it's client-server and multiplatforme. This means that the application layer it's separated from the database management. The application it's the user interface – this is the client – and the database layer which is managed by the mysql community server – this is the server part. On the other hand both the application and the mysql server runs on different platforms (actually linux and windows). You can run the mysql server on linux, the application on windows, or vice versa, or in any other combination of these. So the installation manual will have different parts for the windows and linux installations.
Installing the database
You will need a functional mysql server on the local network. So if you haven't one, let's download the community server from mysql.com. Download the windows installer, if you have windows on the server, or install the mysql-server package from your linux distribution.
You can download the mysql gui tools – administrator and query browser – if you want to create the databases and the users with a graphical tool instead of the mysql command line client.
Installing the mysql server on windows you can choose the complete, or the usual installation. If you want to compile the application from source under windows you have to choose the complete installation. In linux you have to install the mysqlclient15.dev package. In windows after the installation you have to configure the server. Choose the utf8 character encoding, give a password to the root user. If you can work phisically on the server, check the root can connect only from localhost checkbox. This way it's safer. We can leave unchecked the mysql/bin directory in path option.
If you installed the 5.0 server, change the sql-mode variable's value to MYSQL40, and restart the service from control panel/administration tools/services, or restart the computer.
Now you have a working mysql server. Connect to it using the administrator tool – as the root user -, choose the restore backup option – under linux change the default path with the change path button to /usr/local/share/qtContgen/sql – under windows open the Program Files/qtContgen/sql directory with the open backup file button, and load the contgen.sql script. Choose utf8 in the select encoding dialog box, and finally press the Restore Backup button. Repeat every step with contgen_update_20080714.sql script. Now you created the contgen database.
You have to create databases for your companies. Give a database name to every company. It's better if the name doesn't contains special characters or spaces. For example if you have a company named Little Store LTD name the database littlestore. Choose the catalogs option in the mysql administrator. In the Schemata window press the right mouse button, and choose create schema. Write the chosen database name in the dialog box – in our example littlestore. Then choose the restore backup option, open the empty_company.sql script, choose utf8 encoding. In the restore selected tables in: combo choose the newly created database – littlestore – and press the Restore Backup button.
Use the above presented procedure for every company you want to keep books for. Make a table with two columns, in the first write the databasename, and in the second the companie's real name. You have to enter this table in the congen databases companies mysql table. Connect to the database with mysql query browser – as the root user-, enter contgen in default schema lineedit. Choose the companies table from the list in the left side of the window, and double click on it. This way in the upper box will appear the select * from companies sql command. Execute it with the execute button. Press the edit button from the lower part of the window, and enter the database and company names from your list, int the company_directory and company_name columns. The id_company column will be filled by mysql. Press the save changes button, check the entered values, executing the select * from companies command, and then you can exit from the query browser.
You still have to create the users. Connect to the mysql server with the mysql administrator tool – as the root user. Press the new user button, enter the name and password (twice) in the edits and press the apply changes button. Choose the schema privileges tab, and give all the available rights for the user for all databases he will have to use - << button. Press the apply changes button, and you can exit from the administrator tool.
Of course the creation of the users and databases you can execute using the mysql command line client tool. For this method read the previous Installation Instructions below.
Installing on Windows
After the creation of the databases and users you have to install the application with the qtContgen-2.0.0-install.exe.
If you want to compile the application from source under windows you will need some tools:
First download and install ftp://ftp.trolltech.com/qt/source/qt-win-opensource-4.4.0-mingw.exe
Install the mysql development files choosing complete installation when you install the server. These are the Program Files/Mysql Server 5.0/install and lib directories. Copy these two to c:/mysql. You will need this step because qmake can't use paths with spaces.
The mingw tools. Install this during the qt installation.
The mingw utils package. Download from http://downloads.sourceforge.net/mingw/mingw-utils-0.3.tar.gz?modtime=1077362266&big_mirror=1, unzip it somewhere and move the contents of the bin directory to c:/mingw/bin.
Add the c:/mingw/bin and c:/qt/4.4.0/bin directories to the path
You have to create a libmysql.a file for mingw. For this enter in the c:/mysql/lib/opt directory and from there execute the following commands:
reimp -d libmysql.lib
dlltool -k -d LIBMYSQL.def -D libmysql.dll -l libmysql.a
You have to compile the mysql plugin for qt. Enter in c:/qt/4.0.0/src/plugins/sqldrivers/mysql and execute:
qmake -o Makefile "INCLUDEPATH+=C:\MySQL\include" "LIBS+= C:\mysql\lib\opt\libmysql.a" mysql.pro
make
Finally download the source code, extract in a freely choosen directory and from there execute:
qmake
make
make install
Linux installation
Because the variety of the linux distributions in this document will be described only the installation from source.
Download the ftp://ftp.trolltech.com/qt/source/qt-x11-opensource-src-4.4.0.tar.bz2 file. Extract it in the current user's home directory, and execute the ./configure make su root password make install commands from there. This will last a few hours and will need the xorg.dev package – or the corresponding package in your distribution.
Install the libmysqlclient15.dev csomagra.
Download the application's source code.
If you executed the above steps create a symlink in /usr/local/bin for the qt.4.4.0-s qmake utility. Execute the following command as root:
ln -s /usr/local/Trolltech/Qt-4.4.0/bin/qmake /usr/local/bin/qmake-qt4
Compile the mysql qt plugin. Enter in the directory you extracted the qt source, enter in the src/plugins/sqldrivers/mysql directory and execute:
qmake -o Makefile "INCLUDEPATH+=/usr/include/mysql" "LIBS+=-L/usr/lib/mysql -lmysqlclient_r" mysql.pro
make
su root password make install
If you have qt4.4.0 as a package in your distribution you can skip the above steps. However I met the qt.4.4.0 package only in debian testing (lenny) distribution yet.
Extract the application's source code in a freely chosen directory in the current user's home directory and execute from there:
qmake-qt4
make
su root-password make install
The previous installation instructions
The application's architecture it's client-server and multiplatforme. This means that the application layer it's separated from the database management. The application it's the user interface – this is the client – and the database layer which is managed by the mysql community server – this is the server part. On the other hand both the application and the mysql server runs on different platforms (actually linux and windows). You can run the mysql server on linux, the application on windows, or vice versa, or in any other combination of these. So the installation manual will have different parts for the windows and linux installations.
In addition, this application has a predecessor with text user interface. Where this older application it's used, the installation will be more easy, you won't need to copy certain files, and you won't need to create the database. Without this older application, you will have to do a little more work.
Installation on Windows
If you have installed the tui contgen application, you will need only the required dll-s and the application executable. If not, you have to copy the contgen subdirectory from the source tree to the c:\usr\local directory. Here you have a contgen.cfg file. This contains the connecting informations to the mysql server. You have to specifiy the username, password, host, port, socket for accessing the server. (port and socket can be 0 and empty string for windows). The host will be the IP address of the computer which runs the mysql server.
If you don't have a working mysql server on your network, you can download the community server from www.mysql.com. If you have a local network, you will have to install it on the server, and the workstations will connect to this. If you have a single computer you will have to install the mysql server on that computer. For the mysql server to work you will need at least Windows 2000 professional. If you downloaded the 5.0 version of the mysql server you will have to change the sql-mode variable value to MYSQL40 and restart the mysql service from the Control Panel – Administrative tools – Services, or you can simple restart the computer. When you configure the mysql server you will have to check the – put the mysql bin directory in path option, otherwise you will be unable to start the msyql client program anywhere on your computer. We will need this for creating the database. In addition to this you will have to check the – root can connect through the network – option too, if you want to manage the database from one of the client computers.
If tye mysql server it's up and running, the next step is creating the database. In the source tree we have a sql subdirectory with a few sql files. We will have to run these in mysql with the following commands:
mysql -h hostiporname -u root -ppassword < contgen.sql
mysql -h hostiporname -u root -ppassword < empty_company.sql
password it's the root's password, which was given in the mysql server configuration process, hostiporname it's the ip address or host name for the computer which runs the mysql server. If you have a single computer this will be localhost, and you can omit the -h localhost part.
If you dislike the command line work – who not – you can download from mysql.com the gui tools. This contains the mysql administrator and the mysql query browser applications. Using the administrator we connect to the server, choose the restore backup option, open the contgen.sql file and click the restore backup button. Same for the empty_company.sql.
If we allready have a working database
– the tui contgen were installed – we steel need to update the
contgen database with the
mysql -h host -u root -ppassword
<contgen_update_20080613.sql
or restore backup from this
file in mysql administrator.
At this point we have a working environment, but we steel can connect to the database as root, and we can use the application only as root too. This isn't what we want, first because it isn't safe to work as the system administrator, and the program architecture needs that the users who are connecting simultaneously to the database have different user names.
To create new users we will need to do two things. First we have to add the new user to the mysql system tables, and to give it permissions for connect to the database. We will type the following commands:
mysql -h host -u root -ppassword
use mysql;
insert into user (Host, User, Password) values ('host', 'username','password');
here the host will be the IP address of the client computer from which the user will connect to the database. If you want to permit for the user to connect from any computer in the local network, you have to set this value to '%'. username and password are the user name and password for the nes user.
insert into db values ('host', 'database', 'username','Y','Y','Y','Y','Y','Y','Y','Y','Y','Y','Y','Y','Y','Y','Y','Y','Y');
here the host and usernama are the same as above. You will have to execute this command for all the databases (databasename) for which do you want to permit the user to connect to. These are the contgen database – contains general options for the application functionality -, the empty database – contains a demo company without explicit data – and all the databases you created for your companies. There are 17 'Y'-s at the end separated with comma. Of course these commands we can enter in a text file, and execute the text file with mysql -u root -ppassword < filename, or with mysql administrator as described above.
flush privileges;
we need this command for mysql to reload its system tables.
Here we can move to the next step. We will have to add the created user to the tables in the contgen database used by the application.
use contgen;
insert into users values (1,'username');
here 1 is the id for the first company from the companies table..
insert into contgen_users (username, data_curenta) values ('username',current_date() );
current_date() is a mysql function which returns the system date.
insert into gest_users (username, data_curenta) values ('username',current_date() );
Here we are. The user can connect to the database. We have to mention here, that in this state of the development, de user can connect to the database, only if its username and password are entered in the contgen.cfg file. This will change due to security reasons
To understand the above mentioned procedure I will put here an example. Let's say that we want to add a user with name john and password bumm. John will have permission to connect to the contgen, empty and testcompany databases from any of the computers in the local network. Let's see the sql command script.
use mysql;
delete from user where User='john';
delete from db where User='john';
insert into user (Host, User, Password) values ('%', 'john','bumm');
insert into db values ('%', 'contgen', 'john','Y','Y','Y','Y','Y','Y','Y','Y','Y','Y','Y','Y','Y','Y','Y','Y','Y');
insert into db values ('%', 'empty', 'john','Y','Y','Y','Y','Y','Y','Y','Y','Y','Y','Y','Y','Y','Y','Y','Y','Y');
insert into db values ('%', 'testcompany', 'john','Y','Y','Y','Y','Y','Y','Y','Y','Y','Y','Y','Y','Y','Y','Y','Y','Y');
flush privileges;
use contgen;
delete from users where username='john';
delete from contgen_users where username='john';
delete from gest_users where username='john';
insert into users values (1,'john');
insert into contgen_users (username, data_curenta) values ('john',current_date());
insert into gest_users (username, data_curenta) values ('john',current_date());
Let's pay attention to the colons, the separator apostrophes, and the case in table, database, and field names. If we misspelled something the mysql server will refuse to execute the script. In this case we have no clue about the statements which were executed and which ones were not. For this reason I introduced the delete commands. The script deletes first the user from the table and then inserts the correct values.
It's scheduled to make a utility for these tasks.
Here we mention that we can add the new user to the mysql system tables using mysql administrator. Choose User Administration – add new user button – enter the username and password (twice) and click the apply changes button. Choose the schema privileges tab, and add all the available privileges to the user (<< button) for all the databases he need to connect. Then click the apply changes button. Of course still we have to add the user to the user... tables in the contgen database.
If you want to create a new database, change the empty in the create database and use statements on the beginning of the empty_company.sql script and run the changed script. Then you have to insert the new database into the contgen databases companies table:
use contgen;
insert into companies (company_directory, company_name) values ('databasename','Company Name');
For the example above, the testcompany database we can insert into companies table with the following commands:
use contgen;
insert into companies (company_directory, company_name) values ('testcompany','This is a test company database');
Of course first we have to create the database with the modified empty_company.sql.
Installation on linux
The part regarding the creation of the database and adding new users it's the same as in windows.
Which differs it's the installation of the application.
As it is known all linux distributions have their own package management system and configuration files. So we will discuss only the installation from source. There are some prerequisites.
First we need the development packages (make, gcc, g++). We need the mysql client development package (libmysqlclinent.dev with some version number). We need also the Qt 4.4.0 X11 open source package, downloadable from ftp.trolltech.com. At last we need the http://tvision.sourceforge.net/rhtvision-2.1.0.src.tar.gz file. We have to extract this in the tvdevel map in root directory and compile and install it with ./configure make mke install. During the configuration it will mention the missing dependencies. We have to install the corresponding packages with the distribution's package manager. Then we will extract the ftp://ftp.trolltech.com/qt/source/qt-x11-opensource-src-4.4.0.tar.bz2 package in a freely chosen directory and install it with ./configure make make install. This will last at least a few hours, so meanwhile we can do something else. Then we will create the /usr/local/mysql directory and make two symbolic links. Ont for the include, and an other for the mysql lib directory. The commands are: ln -s /usr/lib/mysql /usr/local/mysql/lib and ln -s /usr/include/mysql /usr/local/mysql/include. We will make an other symbolic link for the qmake version 4.4.0: ln -s /usr/local/Trolltech/Qt-4.4.0/bin/qmake /usr/local/bin/qmake-qt4. We will use this to create the Makefile. We are almost done, a last task is to compile the Qt4 mysql database plugin. We compile this using the instuctions from usr/local/Trolltech/Qt-4.4.0/doc/html/sql-driver.html.
At last we can compile the application. We will download the source, extract it to the chosen directory. Here we execute the qmake-qt4 and make commands. If all the steps were successfull we have at last the qtContgen executable.
If the mysql server runs on a linux box and we want to connect from the same computer, we have to set the socket value in the contgen.cfg file. This we will know using the mysql client program. After the mysql> prompt we write \s and press enter. The client will list the server parameters (version, port, socket and so on). These values we have to insert in the contgen.cfg file. If the application runs on linux, but the mysql server runs on a different computer in the local network – regardless if this computer runs windows or linux – the socket and port can remain empty string and 0.